painting sunny


Leave a comment

Mama’s Best Buttery Biscuits

There are just those days in life when nothing short of a warm, sofa, golden-brown buttery biscuit will solve your problems. There are actually quite a few days like that. So, after experimenting with about a dozen popular biscuit recipes (flashbacks to my days of pancake obsession) and adjusting things a bit here and there, I found the biscuits that not only look like they belong in a Norman Rockwell family scene but taste exactly like a good biscuit should taste. The butter on the biscuit icing on the cake is that they cost just a few cents to make, are quicker than you would expect, and freeze reaaaally well.

Buttery Biscuits | Painting Sunny

Aren’t they pretty?

Buttery Biscuits | Painting Sunny

Grab those ingredients and lets go! One quick trip to the pantry and fridge should take care of it; this isn’t a fancy recipe.

Ingredients:

  • 3 cups all-purpose flour (I prefer unbleached)
  • 4 1/2 tsps baking powder
  • 2 tbls white sugar
  • 3/4 tsp Cream of Tarter
  • 1/2 tsp salt
  • 3/4 cups butter, very cold
  • 1 whole egg, lightly beaten
  • 1 cup milk (whole milk is good, but any will do)

Preheat your oven to 450 degrees, with a rack in the middle.

Note: The recipe makes about 18 decent-sized biscuits. Adjust according to the size of your family and appetites!

Buttery Biscuits | Painting Sunny

Mix your dry ingredients together in a bowl. I use my kitchen-aid mixer. I loooove her.

Buttery Biscuits | Painting Sunny

Cut in the cold butter until it is pea-sized. This where a pastry cutter would come in really handy… and why it is now at the top of my wishlist. Someday…

Mix the egg and milk together, and then pour into the flour/butter mix.

Stir gently until just mixed and formed into a soft ball. If you are not using a standing mixer, a fork works nicely for this step.

Tip: Make sure that butter is frosty. You don’t need to literally freeze it, but I shove mine in the freezer for at least 15-20 minutes before making the biscuits. It wouldn’t be a horrible idea to chill your bowl beforehand too. The colder the butter is when it bakes, the better these biscuits will turn out. I know, I know… you’re already thinking you’ll just skip that step. Please, think of the poor little biscuits…

Buttery Biscuits | Painting Sunny

Turn out the dough onto a floured surface and pat down until it is about 1/2″ or 3/4″ thick. Do not use a rolling pin on this step. Patting it down with your hands is what gives it the flakey layers later. A rolling pin will destroy all those pretty little layers, which is just cruel.

Buttery Biscuits | Painting Sunny

Use a cookie cutter or biscuit cutter to stamp out your biscuits. After you have as many circles cut out as possible, take the leftover dough and gently form it together with your hands and pat it back down. Cut out as many more circles as possible. Continue until you run out of dough. Which happens to me every time I run to Target.… get it?

Buttery Biscuits | Painting Sunny

It helps if you hoist a 3 year-old onto the counter and make them do all the hard work.

Transfer biscuits to a baking sheet or stone.

Bake in the oven for 10-12 minutes until golden-brown.

Buttery Biscuits | Painting Sunny

Yum. A favorite, to be sure.

Buttery Biscuits | Painting Sunny

As a bonus, they freeze really well. I stick the leftover ones, unbaked, onto a cookie sheet and stick the sheet in the freezer to let them flash freezer. Then, I move them into a freezer-safe baggie as shown below. They keep in the freezer for up to a couple months, I think. Freezing them first on the cookie sheet lets moisture get out of the biscuits as they freeze, which apparently is really important.

Whats your ultimate comfort foods? Favorite biscuit toppings? I like a nice jam and some real butter, personally. Although some egg and cheese can be tasty too. Mmmm…. biscuits.

Sorry for the inconsistent watermarks on the photos. I’m getting a little too experimental.

Mama’s Best Buttery Biscuits

Ingredients:

  • 3 cups all-purpose flour (I prefer unbleached)
  • 4 1/2 tsps baking powder
  • 2 tbls white sugar
  • 3/4 tsp Cream of Tarter
  • 1/2 tsp salt
  • 3/4 cups butter, very cold
  • 1 whole egg, lightly beaten
  • 1 cup milk (whole milk is good, but any will do)

Preheat your oven to 450 degrees, with a rack in the middle. Mix your dry ingredients together in a bowl. Cut in the cold butter until it is pea-sized. Mix the egg and milk together, and then pour into the flour/butter mix. Stir gently until just mixed and formed into a soft ball. Turn out the dough onto a floured surface and pat down until it is about 1/2″ or 3/4″ thick. Use a cookie cutter or biscuit cutter to stamp out your biscuits. After you have as many circles cut out as possible, take the leftover dough and gently form it together with your hands and pat it back down. Cut out as many more circles as possible. Continue until you run out of dough. Transfer biscuits to a baking sheet or stone. Bake in the oven for 10-12 minutes until golden-brown.

PS: This is not a sponsored post. All opinions are my own, and I have not received compensation for anything written. Keepin’ it real.


Leave a comment

Southerwestern Salmon Salad

I don’t really know if salmon is a common component of Southwestern Cuisine. Oh well. This tastes good.

This is another “practically not a recipe” recipe, since it is basically taking things you really like and mixing them together in a nice way. I have to share, though – it was delicious.

Southwestern Salmon Salad | Painting Sunny

It is both warm and cold, and quite filling. FYI: that bowl above is not a normal sized bowl. It is, in fact, mixing bowl sized. Please don’t judge me.

Southwestern Salmon Salad | Painting Sunny

Gather your ingredients:

  • Romaine lettuce hearts
  • Ripe tomatos
  • Pinto beans  (as seen in the plastic leftovers container above… it was from tacos)
  • No-salt-added whole kernel corn (again, in a plastic container)
  • Salsa
  • Ranch dressing (I like the Greek yogurt version from Bolthouse Farms, in the produce section)
  • Pink salmon, from package or can
  • Hot sauce, optional

… and whatever else you like on salads of this sort. Obviously.

Southwestern Salmon Salad | Painting Sunny

Chop up your veggies.

Warm up your pinto beans and corn. I use the microwave.

Southwestern Salmon Salad | Painting Sunny

… and toss all your ingredients together in a way that looks aesthetically appealing.

Eat. There you go.. wasn’t that delicious, and healthy too?

I am amazed I did not add feta cheese or artichokes to this. Those are like sacred foods in my life, to be eaten at every meal. Maybe next time…

Anyone else found any good uses for those packets of ready-t0-eat salmon? Recipes where the titles are alliterations?

PS: This is not a sponsored post. All opinions are my own, and I have not received compensation for anything written. Keepin’ it real.


5 Comments

Bestest Ever Perfect Pancakes

I dedicated the entire 27th year of my life to finding the perfect pancake recipe. I kind of wish I was joking here, now that I see how that looks in writing. Anyway, I ended up with this recipe that is, in my humble opinion, the best pancake recipe ever. Which means I make the best pancakes ever. Well, there went the humble.

Bestest Ever Perfect Pancakes | Painting Sunny

They have a buttermilk flavor, are super extra fluffy, and bake up to a perfect golden brown. See, as evidenced above. Those were silver-dollar sized, so they might look a little miniature  Especially if you’re from Bloomington, Indiana and are familiar with the famed Village Deli. (Which people sometimes call “V.D.” which sounds really gross, but you learn to get used to it and start calling it that yourself.)

Bestest Ever Perfect Pancakes | Painting Sunny

Gather your ingredients, which are pretty much all pantry staples. I do not understand why people buy pre-made pancake mix.

Note: Below is enough to feed my family of four, which includes two adults and two children. Alter servings as you need.

Ingredients

  • 1 1/2 cups milk
  • 4 tbls vinegar
  • 2 cups all-purpose flour
  • 4 tbls sugar
  • 2 tsp baking powder
  • 1 tsp baking soda
  • 1 tsp salt
  • 2 eggs
  • 4 tbls melted butter
  • cooking spray
  • toppings as desired (we like 100% maple syrup, but I also love to add a couple blueberries or a few chocolate chips!)

What I love about this recipe is that it is super fluffy, without having a baking powder or baking soda weird taste, which others have. I know – I literally made 20+ pancake recipes before this one.

Bestest Ever Perfect Pancakes | Painting Sunny

Combine the milk with the vinegar in a large bowl and set aside for five minutes. This will “sour” the milk, which gives it the amazing flavor.

Mix the flour, sugar, baking powder, baking soda, and salt in a medium bowl.

Whisk the eggs and melted butter into the milk mixture after it’s five minutes are up.

Yes, the little pink bowl above is one of my kids plastic dishes.

Bestest Ever Perfect Pancakes | Painting Sunny

Gently stir the dry ingredient mixture into the wet ingredient mixture.

Spray some cooking oil onto your griddle or pan and let it get nice and hot. That sounded a little sexy for a breakfast recipe.

Bestest Ever Perfect Pancakes | Painting Sunny

Scoop out some pancake mixture onto the griddle or pan. You may need to use your scoop or a utensil to gently spread out the edges. This batter is thick, which is why I used the word scoop instead of pour. Seriously, I think that is why it turns out so fluffy.

I use a 1/4 cup measurer  that is not quite full to make silver-dollar size. I use a heaping 1/2 cup measurer or bigger for more restaurant-sized pancakes.

Wait until one side turns golden brown and some bubbles appear on the top of the batter, then flip them.

Bestest Ever Perfect Pancakes | Painting Sunny

Let the pancakes finish cooking until both sides are golden brown. Serve with your favorite toppings! I am a serious syrup snob, I’m a little embarrassed to admit. I hate the taste of the fake “table syrup” or “pancake syrup” stuff, so splurge on 100% maple syrup. Did you know they can’t call it maple syrup exactly on the bottle, unless it is 100% pure? There are also different grades of syrup such as “A” or “B”. Okay, I’ll stop now.

Bestest Ever Perfect Pancakes | Painting Sunny

Delicious. I highly recommend.

Anyone else willing to try a million (or just 20) recipes to find the perfect one? Or super pretentious about their maple syrup? I’m like that with a few things, but I swear I will eat mac and cheese from a box just like the rest of the world.

PS: This is not a sponsored post. All opinions are my own, and I have not received compensation for anything written. Keepin’ it real.


Leave a comment

Smoooth Peanut Butter

Please make sure to sing that title along to the tune of “Smooth Operator”. I promise, it sounds much better than.

As promised, this is the follow-up to my less-than-lovely Green Smoothie attempts I over-shared on Monday. I think things are looking up! :)

Chobani yogurt has it’s own smoothie recipes, and just a moment of Googling later I was ready to whip up a Peanut Butter Smoothie. (This is not a sponsored post. For real). Really, a Peanut Butter Banana Chocolate SMoothie. I guess Chobani wanted to keep the title short and sweet.

Peanut Butter Banana Smoothie | by Painting Sunny

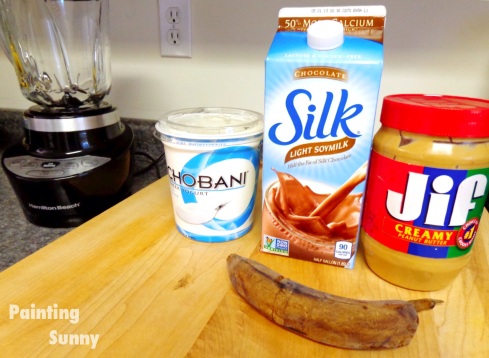
I gathered my ingredients.

Peanut Butter Banana Smoothie

  • 1 cup Chobani plain yogurt (this is different than the original Chobani recipe – they use vanilla)
  • 1 cup chocolate soy milk (I used light Silk)
  • 1 ripe banana, frozen
  • 2 tbl smooth peanut butter

Frozen bananas just do not look pretty. They do seem to be better flavored and easier to mix in with things, though… and, a great way to not waste bananas that are getting a little too ripe! Just pop them right in the freezer.

Peanut Butter Banana Smoothie | by Painting Sunny

I added the ingredients, as director, with liquid ingredients first going into the blender.

Peanut Butter Banana Smoothie | by Painting Sunny

Whipped it up!

Peanut Butter Banana Smoothie | by Painting Sunny

Voila! Well, sort of. To be honest, it was originally a little too thick and tangy. Both my husband and I thought the greek yogurt overpowered the taste, and it was a little too dense.

So, I left what was still in the blender there, and put it in the fridge while I moved on with  my day. Later that afternoon I just grabbed the blender, and added a more chocolate soy-milk, another half a banana, and whipped it again. Muuuuch better. I ate some then, but saved the rest for breakfast the next morning.

Personally, I am always hungry. I have been ever since I stopped eating meat. Essentially, I’ve been somewhere between “a little bit peckish” and “so hangry I want to push people down stairs” for 6 years now. So, I was truly impressed with after this smoothie I wasn’t all that hungry again until near lunch.

Normally, I start jonesing for lunch around 9:45am. Yay for smoothies!

Meanwhile…

Strawberry Spinach Banana Smoothie | by Painting Sunny

I’ve tried out a couple new ones, as well! The above picture may be familiar from a Tweet sent this past Sunday.Sorry for the not-so-hot iPhone pic!

Strawberry, Spinach, Banana Smoothie

  •   6 strawberries
  • 1/2 a ripe banana
  • 5-6 fresh spinach leaves
  • 1 cup light vanilla soymilk
  • 1/3 cup Chobani plain yogurt

This one was the best by far! Seriously, I could eat this all the time. Kind of wish those strawberry seeds weren’t so grainy… but it was good! This morning, I also whipped up the same thing but minus the spinach and with a little bit of smooth peanut butter added. Now I’m just like Dr. Frankenstein with these things.

Suggestions for other smoothie add-ins? Anyone else in a constant state of hunger/hanger/vanger? Yes, vanger is when hungry+angry=violent. This is a real affliction, people.

PS: This is not a sponsored post. All opinions are my own, and I have not received compensation for anything written. Keepin’ it real.


1 Comment

Trials and Tribulations of Smoothie Experimenting

I could have gone for an “It’s Not Easy Being Green” type schtick, but it was just a little too obvious, right?

As I exclaimed last week when brainstorming fresh-spinach uses, I wanted to try out some smoothie recipes. First problem encountered was of course not having any appliance that blends solid food items into a smooth consistency. Problem solved: I ran into Target and grabbed a blender that seemed decent. I chose a Hamilton Beach model (this is not a sponsored post) because it wasn’t the cheapest, didn’t take up too much space, and wasn’t the most expensive. I paid around $34 for it.

I know there are some amazing blender and smoothie systems out there, but until I have committed to a serious smoothie lifestyle I cannot drop $150 on something with such a specific use. Check back with me in a year!

Leaving Target, I Googled the Green Smoothie recipe from Two Peas and Their Pod on my phone, and swung into the grocery store to grab the ingredients I didn’t already have at home. Our local Target sells groceries but they are both oddly packaged and oddly expensive. Is this just me? 

And then, I did something wrong.

An Attempt At Green Smoothie Making | by Painting Sunny

I should not have watermarked this image.

If you’re thinking “Honey, that smoothie does not look good” then you’re right. It really wasn’t.

I’m still not really sure what I did the most wrong. I have a few guesses, though. I want to be clear that this was completely my fault. The original recipe from Two Peas and Their Pod is obviously much prettier, and from the comments obviously much tastier than mine.

As you can tell if you read the original Two Peas and Their Pod recipe, and check out my list of ingredients below, I didn’t have an orange so used more strawberries instead. Otherwise, I swear I followed it exactly as it was written… but I think that orange may have made a much bigger difference than I predicted.

I used:

  • 1/2 of a large banana (not frozen beforehand)
  • 9 strawberries
  • 2 cups fresh spinach
  • 1/3 cup Chobani plain yogurt
  • 1 cup ice

The other issue is that my new blender seems to blend things fine… but not particularly large ice. We have a built-in ice-maker in our freezer, which produces very large and dense ice, so it took way more runs of the “smoothie setting” and pulse to get the ice chopped up. I’m brainstorming ways around this; I may just try a couple recipes that don’t use ice.

An Attempt At Green Smoothie Making | by Painting Sunny

So, I gathered up the above ingredients (except half the banana was given as a snack to a nearby child) and got started. I’m making my favorite soup this weekend, so was happy to have a big bag of spinach on hand.

An Attempt At Green Smoothie Making | by Painting Sunny

I got everything all chopped up nicely and put in the blender pitcher… except the directions indicated all liquids should be on the bottom, and I forgot to add the yogurt until the end. Greek yogurt is pretty thick, though… but I’m guessing it is still considered a liquid.

An Attempt At Green Smoothie Making | by Painting Sunny

I took a deep breath and prepared myself for some smoothie magic. Doesn’t it all look so pretty in there? Bright, vibrant, healthy colors?

An Attempt At Green Smoothie Making | by Painting Sunny

Eww. Well, I didn’t expect that. Yes, that looks like grey-green-brownish sludge. And a spinach leaf still floating in it. I did promise y’all that I would share my failures as well as the successes. There you go.

An Attempt At Green Smoothie Making | by Painting Sunny

It didn’t taste all that bad, but could use… well, a lot of improvement. I’ll be back on Wednesday, I hope, with at least one successful smoothie conquest to brag about.

Anyone else living in struggle city, with their blender? First-time smoothie making? Please reassure me I’m not alone. I’m also guessing this post won’t be pinned a lot.

PS: This is not a sponsored post. All opinions are my own, and I have not received compensation for anything written. Keepin’ it real.


1 Comment

Make The Most Of It: 5 Recipes Using Fresh Spinach

Is anything worse than throwing out half a bag of fresh spinach, because it went south when you couldn’t find a use for it? It is almost impossible to buy “just enough” for one recipe, and I really do love fresh spinach. It is just so wasteful to toss half of it because it turned the corner into ickyville.

In cold weather months, I make a big batch of Minestrone Soup about once every two-three weeks, and often have the very best intentions when I buy that bag of pretty green leaves… only to discover the leftovers a week later, and grieve its loss. So, I sat down tonight with a cup of my new favorite tea and made  a list of 5 worthy recipes using fresh spinach. Here we go!

Minestrone 12

Spinach Artichoke Pasta  by The Pioneer Woman: This is amazing, really and truly. If you love spinach artichoke dips (obviously you do, it’s also amazing) The Pioneer Woman has discovered a way to make a legitimate dinner out of it. This is delicious, and our kids even ate it! Also check out her recipe for The Best Spinach Artichoke Dip Ever.

Minestrone Soup by Painting Sunny: My own version of minestrone soup, this is healthy, very affordable, vegan (don’t let that be a turn-off), and makes enough to freeze for many a meal. Fresh spinach is what makes this soup reach a whole new level of deliciousness and wholesomeness. That’s a lot of ness, right there.

Vegetarian Spinach and Mushroom Lasagna by Simply Recipes: This looks amazing. Full disclosure, I haven’t tried this recipe yet. For years I’ve used the Barilla No Boil Lasagna Noodle recipe from the box, and just substituted vegetables in place of the Italian sausage. Usually, I use spinach, zucchini, mushrooms, and maybe a red or yellow bell pepper. Ms. Bauer’s version looks looooovely, and will be utilized the next time I get a craving for a big hearty Italian dish. It does call for frozen spinach, but I’m thinking fresh would fit in alright, don’t you?

Scrambled Egg Quesadillas by Painting Sunny: This is a staple in our household. We practically have a quota of how many of these we eat on Monday nights. I love adding fresh spinach and maybe a little artichoke heart to mine, to kick up the flavor. Affordable, quick, and family-friendly: a triple-threat. This is the Jennifer Hudson of recipes.

Asparagus, Spinach & Feta Quiche by Two Peas & Their Pod: This is one other recipe I haven’t tried yet, but I am excited to have found. I’ve made spinach quiche before… and it always called for frozen spinach, and always turned out… well, weird. This recipe calls for fresh spinach, and looks like a fantasy of weekend morning brunches. Their Green Smoothie recipe is also intriguing… I just need an appliance that makes smoothies first.

Well, that’s a wrap. A spinach wrap, really. Anything else I’ve left off? Fresh spinach is such a versatile ingredient, really, this list could blow up to 10, 20, or more I’m sure… Keep calm and cook on!

Minestrone 8

Spinach Quesadillas 11

PS: What is that new favorite tea you ask? I’m obsessed. It is Sweet Cinnamon Spice Herbal Tea by Private Selection (Kroger brand). It tastes like melted red hots candy but not quite as hot and sweet, and more tea-like. Clearly, impossible to describe. 

PPS: This is not a sponsored post. All opinions are my own, and I have not received compensation for anything written. Keepin’ it real.


1 Comment

Make Yourself A Dang Quesadilla

Okay, raise your hand if you picked up on that Napoleon Dynamite reference. Anyone? Anyone? Okay, let’s take a moment to catch up.

Now, time for some Scrambled Egg Quesadillas!

Last year I was at our local discount bookstore and paid $1 for a copy of Quick, Quicker, Quickest: 350 delicious meals ready in 20, 30, or 40 minutes! by Better Homes and Gardens. If you click here it looks like Amazon has it for pretty close to that price, too. This is not a cookbook recommendation or review, though. In fact, the cookbook itself has been only mildly useful. For $1 it was worth it, though, just for this one recipe (page 241 in the book, in the 30-Minute Meals section) which is our new favorite, and we now eat in excess at least once a week.

Spinach Quesadillas 10

These are quick, super affordable, and pretty family friendly depending on what you add. I add a little spinach or artichoke inside mine, so this is pretty dang customizable. Which appears not to be a word… which is weird because I hear people say that all the time.

Abbreviated version of the recipe is at the bottom of the post.

Spinach Quesadillas 5

Gather those ingredients… no worries, I’ll wait here for you:

  • 1/4 cup finely chopped onion
  • 3 tbs diced green chilies (like you can buy in a cute little can)
  • 1 tbs butter
  • 6 eggs
  • 3/4 cup grated queso quesadilla cheese (as seen in the picture below)
  • salt & pepper to taste
  • cayenne pepper (optional)
  • four-six 10-inch flour tortillas
  • Nonstick cooking spray
  • Toppings such as salsa, hot sauce, etc.

Spinach Quesadillas 6

We did change it up a bit from the original cookbook recipe… substituting  ingredients we like more, especially the cheese. I loooove this Cacique Queso Quesadilla stuff. This is not a sponsored post, but if someone tried to bribe me with this stuff… well, my willpower would be tested. It melts to perfection. Perfection I tell you.

Spinach Quesadillas 1

Heat a large skillet or pan on medium heat and start off with melting your butter. Okay, fine, I used just a smidgen more than 1 tbs… I just really like butter.

Spinach Quesadillas 2

Add your diced onions to the skillet and let them cook for a few minutes until they get soft and a little browned.

Toss the 3 tbs of diced green chilies in there and let those cook 2-3 minutes as well. This is not pictured above… but the chilies are totally what makes the flavor of this dish.

Spinach Quesadillas 3

While that cooks, crack your eggs into a bowl and add some salt and pepper. Beat the eggs an extra moment or two, so they will cook up a little bit fluffy. Add about 1/3 of the cheese and stir it in.

Once your onion/chili combo is ready, turn the heat down to medium-low and let it cool down just a minute. Spread the onions/chilies evenly around the skillet, using a spatula. Add your eggs to the pan, and tilt the pan around until it evenly covers the bottom.

Spinach Quesadillas 4

Let the eggs cook just a bit, then stir them. It may look really brown from the cooked buttery onion stuff in the pan – no worries, as it cooks it won’t look so dramatic.

Occasionally flip and gently stir around the eggs, making sure they cook through. When they’re done, turn off the heat.

Spinach Quesadillas 7

Spread a little more of your cheese over the middle of half the tortillas. I just take the grater and grate it right over the top of them.

Spinach Quesadillas 8

Spoon some egg mixture from the skillet into the middle of those tortillas, right over the cheese. Spread it out a little, but not too close to the edge – you don’t want it to get squished out. Spread the rest of your cheese over top of the egg on each one, as shown above.
Spinach Quesadillas 9Either clean up your skillet from before, or get another one ready. Heat it up until it’s warm, over medium heat, and spray some non-stick cooking spray on it. Put the other half of the tortillas over top of the egg and cheese covered ones. Carefully transport a quesadilla into your skillet.

Cook it on one side for 1-3 minutes, until lightly browned and the cheese has melted. Flip it over, and cook the other side.

I use a cast-iron press made by Lodge company, to press the quesadillas down. If you don’t have a press, you can either just skip it being pressed down and plain-old cook it, or you can use the bottom of a smaller pan to press it. I do love this cast-iron press, though. It will last longer than anything else on earth, and makes a killer panini too.

Spinach Quesadillas 11

Seriously,yum. You can see I wasn’t lying about adding the spinach to mine. I use a knife or pizza-cutter to slice them into quarters (or eighths for the kids) and serve them with sides like a southwestern salad, cold pineapple, or sliced oranges.

Anyone else finding ways to make every dinner actually be breakfast? Breakfast is just the bees knees, you know? Any other $1 cookbook finds? Or Napoleon Dynamite references?

Scrambled Egg Quesadillas

  • 1/4 cup finely chopped onion
  • 3 tbs diced green chilies (like you can buy in a cute little can)
  • 1 tbs butter
  • 6 eggs
  • 3/4 cup grated queso quesadilla cheese (as seen in the picture below)
  • salt & pepper to taste
  • cayenne pepper (optional)
  • four-six 10-inch flour tortillas
  • Nonstick cooking spray
  • Toppings such as salsa, hot sauce, etc.

Heat a large skillet on medium heat. Melt your butter. Add your diced onions and cook 3-4 minutes until soft and lightly browned. Add the chilies  and cook 2-3 minutes. While that cooks, crack your 6 eggs into a bowl and add some salt and pepper. Beat the eggs an extra moment or two. Stir in about 1/3 of the cheese.

Once your onion/chili is ready, turn the heat down to medium-low. Spread the onions/chilies evenly around the skillet. Add your eggs to the pan, and tilt the pan until it evenly covers the bottom. Occasionally flip and gently stir around the eggs, making sure they cook through. When they’re done, turn off the heat.

Spread a little more of your cheese over the middle of half the tortillas. Spoon some egg mixture into the middle of the tortillas, right over the cheese. Spread it out a little, but not too close to the edge. Spread the rest of your cheese over top of the egg on each one.

Heat a skillet until it’s warm, over medium heat, and spray some non-stick cooking spray on it. Put the other half of the tortillas over top of the egg and cheese covered ones. Carefully transport a quesadilla into your skillet. Cook it on one side for 1-3 minutes, until lightly browned and the cheese has melted. Flip it over, and cook the other side. Cut the quesadilla into quarters and enjoy!

PS: This is not a sponsored post. All opinions are my own, and I have not received compensation for anything written. Keepin’ it real.


2 Comments

All-time Favs: A Whole ‘Lotta Minestrone Soup

I literally live off this soup sometimes. Not joking. The saving grace is that this soup is healthy, affordable, and not all that hard to make. Believe me, I’ve got it down to a science at this point. Or maybe an art. Either way, it’s delicious. And vegetarian, actually.

This is my all-time favorite soup.

Minestrone 7

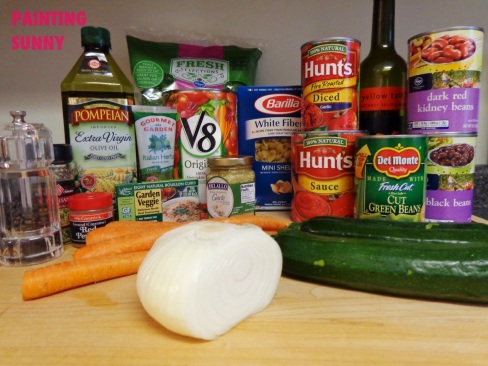
Okay, the picture below looks like a whopping amount of ingredients. Bear with me for a minute. Most of the ingredients are canned; although they don’t have to be, that’s just what I use. You can see I used a mix of name-brand and store-brand ingredients. Honestly, with a tight budget and a family of four I buy whatever is most affordable except for items we just really prefer the taste of the name-brand. Many of the ingredients are also stock items you probably already have in the kitchen. I would guess I make about 10 big bowls-worth of this soup at one time, and it costs about $10 total. So, about $1 per bowl…. and I make really large portions per bowl.

Minestrone 13

Gather your ingredients: (full recipe at the bottom of post)

  • 3 tbls extra-virgin olive oil (EVOO)
  • 1 tbl diced garlic (I like the jars from Delallo)
  • 1/4 cup chopped yellow onion
  • 3 whole carrots
  • 3 medium-sized zucchinis
  • 2 cups fresh baby spinach
  • 1 quart V8 juice (seriously, V8 tastes so much better than the generic or just tomato juice)
  • 4 cups vegetable stock
  • 2 cups tomato sauce
  • 1/4 cup red wine (optional, but I think it makes it extra delicious)
  • 1 can dark red kidney beans
  • 1 can black beans
  • 1 can green beans
  • 1 can diced tomato (I like the “fire roasted” ones)
  • 1 tbl fresh herbs (I use a squeeze tube from the produce section of my local Kroger, which is “italian herbs” but you could use fresh oregano, basil, etc.)
  • 1/4 tsp cayenne pepper
  • dash of salt
  • 1/2 tsp black pepper
  • 1 cup seashell pasta (I like the mini-shells from Barilla. They are tasty and adorable at the same time).
  • Toppings: I love saltine crackers and parmesan cheese, but goldfish crackers, a spritz of olive oil, or whatever you like would be great!)

Obviously, many of the above ingredients are optional or could be substituted. It’s soup, ya’ll – that’s how it works. When I first made minestrone  I used Jamie’s Minestrone recipe from Allrecipes. Over time, I altered it to suite my taste and pantry-stocking-abilities and at this point it is at least 60% different. That is true of a lot of things in life, isn’t it? Oh wait, I’m getting all philosophical – let’s get back to to the soup. Don’t mind me.

Minestrone 12

Let’s get started! I have no attention-span whatsoever.  I’m not joking. While writing this, it is entirely likely I forgot what I was doing and went to make a sandwich – twice. So, before I start the heat on the stove I go ahead and prep all my vegetables, get a spoonful of diced garlic out, and so on. Then, I don’t have to panic mid-cooking because a Criminal Minds marathon started and I wandered off.

Chop your zucchini and carrots into like-sized cubes. That is super important, so it will all cook evenly. Dice your onion. Slice up that spinach a bit too, while you’re at it. I also remove the stems if it is the kind that has them. If you aren’t using already-diced garlic, go ahead and dice that bad boy.

Minestrone Compiled Pictures.jpg

In the meantime, heat your olive oil in the bottom of a stock-pot on medium-heat. It needs to be large – this is a ‘lotta soup. I warned you.

When your oil is hot enough, add your garlic and saute until it is very lightly toasted and aromatic, about 1 minute.

Turn the heat up just a touch, and then add your diced onion and saute until it is to your liking. Some people like it almost raw. I call those people crazy. I cook mine until it is nice and caramelized and light brown, about 4 minutes.

Add your carrots and saute for 4-5 minutes until just starting to cook through.

Minestrone Compiled Pictures 2.jpg

Add your quart of V8, vegetable stock, tomato sauce, diced tomatoes (do not drain first), and red wine. Bring to a boil, stirring very frequently.

Once boiling, reduce the heat to low and add black beans, kidney beans, green beans, spinach, zucchini, and all spices and seasonings. You will notice that the spinach and zucchini float at the top at first. No worries, they will settle down after a couple minutes. It’s just weird physics…. I think.

Minestrone 11

If you have never used vegetable buillon cubes and want to, here is how I do it. I buy tiny little cardboard boxes of them in the healthy-food section of the grocery store. Then, I heat up a pyrex full of 2 cups of water in the microwave for 2 minutes. I chop a little cube up into smaller squares and add it to the very hot water, and stir it until it is pretty much dissolved into it. Since this recipe calls for 4 cups, I do this twice.

Let your soup simmer on medium-low for at least 30-40 minutes. Longer is better, honestly. This is a great lazy Sunday meal.

Minestrone 10

Meanwhile, boil some water and cook your seashell pasta until al dente. Do not overcook it! Please, I beg you. Nobody likes a mushy seashell.

Minestrone 9

If you’re eating it right then and there, go ahead and add a couple spoonfuls of seashell pasta to each bowl. Ladle some soup over the top of each and stir.

I think this is amazing and delicious and a good amount of your daily servings of vegetables. Basically, a triple-threat. I think it is even better after time. With soup, the flavors really meld over time… so leftovers should be stored in the fridge for the next day or…

Minestrone 8

FREEZE-AHEAD TIP:  Freeze it in mass quantities  I make this for just myself usually, and eat one bowl right after it cooks. Then, I divide the rest into quart-size freezer bags, adding to each bag about what I would eat for a dinner. Which is an embarrassingly large bowls-worth. This makes 10 total dinners for me, so I freeze 9.

I add all of the pasta to the pot and stir it in well. Then, I leave the bags to cool completely on the counter for about an hour. I then stack them lying flat in the freezer and enjoy 9 delicious dinners later on!

REHEAT FROM FROZEN TIP: Stick a bag in the microwave for 2.5 minutes. Remove the bag and empty it into a bowl. Cover with cling wrap. Microwave again for 2.5 minutes. Lift one edge of the cling wrap and stir. Microwave again for 2.5 minutes or until warm – will depend on your microwave. Add your fav toppings and enjoy! Warning, the bowl will be hot.

Painting Sunny Minestrone Soup

Ingredients:

  • 3 tbls extra-virgin olive oil
  • 1 tbl diced garlic
  • 1/4 cup chopped yellow onion
  • 3 whole carrots
  • 3 medium-sized zucchinis
  • 2 cups fresh baby spinach
  • 1 quart V8 juice
  • 4 cups vegetable stock
  • 2 cups tomato sauce
  • 1/4 cup red wine (optional)
  • 1 can dark red kidney beans
  • 1 can black beans
  • 1 can green beans
  • 1 can diced tomato
  • 1 tbl fresh herbs
  • 1/4 tsp cayenne pepper
  • dash of salt
  • 1/2 tsp black pepper
  • 1 cup seashell pasta

Chop your zucchini and carrots into like-sized cubes. Dice your onion. Slice up that spinach and remove stems. Dice garlic if it is not pre-diced.

In the meantime, heat your olive oil in the bottom of a stock-pot on medium-heat. When your oil is hot enough, add your garlic and saute until it is very lightly toasted and aromatic, about 1 minute. Turn the heat up just a touch, add your diced onion and saute  about 4 minutes. Add your carrots and saute for 4-5 minutes until just starting to cook through.

Add your quart of V8, vegetable stock, tomato sauce, diced tomatoes (do not drain first), and red wine. Bring to a boil, stirring very frequently. Reduce the heat to low and add black beans, kidney beans, green beans, spinach, zucchini, and all spices and seasonings.

Let your soup simmer on medium-low for at least 30-40 minutes. Meanwhile, boil some water and cook your seashell pasta until al dente. Add a couple spoonfuls of seashell pasta to each bowl. Ladle some soup over the top of each. Add toppings as desired (crackers, Parmesan, etc.)

Can be frozen ahead in quart-sized freezer bags and re-heated in the microwave; follow instructions included with recipe on Painting Sunny.

PS: This is not a sponsored post. All opinions are my own, and I have not received compensation for anything written. Keepin’ it real.


Leave a comment

Random Rundown: star ratings, bagel pizzas, winter weather, and a fitness focus

Well, I saved up enough little random tidbits to compile one strange and all-over-the-place post here. Let’s get started, shall we?

I’m starry-eyed. You may notice something a little more glamorous around here! Specifically, a lot more stars. I’ve added a star rating system to the book reviews I have already posted and will include it in future book reviews too. It goes a little somethin’ like this:

1 star rating.png


2 star rating.png

3 star rating.png

4 star rating.png

5 star rating.png

A disclaimer might be in order. To be fair, when I review a book and assign it a rating I consider many things. A few of them include: Did the book do what it set out to do? Compared with books I have read in a similar genre and style, where did this book fall? Did I enjoy the story? Did the book feel true and authentic? Was the writing technically done well? Did the author find their voice?

It is always hard to judge a book, even when you’re not doing it by it’s cover. Books are beautiful things, and are the result of amazing gifts and hard work by the authors who create them. I never mean a rating to be a judgement on the value of that author’s body of work. It is my personal opinion which I formed with my own unique tastes, perspective, and background as a reader.

Sometimes, it feels a little strange to consider a silly little work by a humorist a 4 star, while an epic tome feels like a clear 3 star. If they had very different answers to the above questions, it happens.

What does a bagel do when it’s locked out of the house? 

Calls a loxsmith, of course! Okay, that was terrible. I apologize. I don’t even know where I heard that one. I’m ashamed.

This recipe for Bagel Pizzas barely counts as a recipe. It is really a way of putting a few things together, to make something the kids will eat. However, the kids have been really into these lately and they are so easy I had to share. They are so simple in fact, a 3 or 6 year-old can even put them together themselves. I have personally witnessed this.

Bagel Pizzas Compiled Bigger.jpg

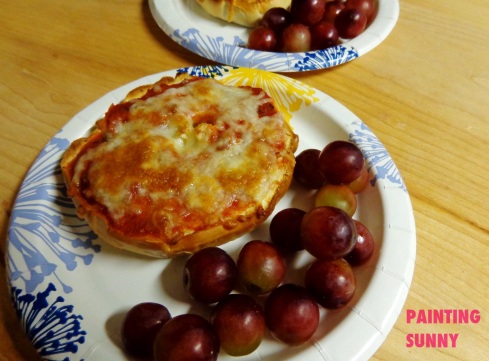
It really doesn’t require much guidance. You split a bagel in half, toast it in the toaster (it will keep it from getting soggy), spread sauce on each half, sprinkle cheese on each half, and broil it on low for 3.5 minutes. I used a red sauce (Ragu, specifically) and Monterey Jack cheese.

Bagel Pizzas 4

I cut each half into four pieces, and serve it with some fruit. It may not be the absolute healthiest option, but if you used a whole-wheat bagel and low-fat cheese it would kick it more into that neighborhood.

I’ll be honest – I actually cut my kids grapes up still before they eat them sometimes. I know they are old enough to handle a grape, but any sort of choking hazard totally freaks me out.
Haven Winter Walk

Enjoying a winter weather walk. There isn’t much snow on the ground in Bloomington now, but there was not long ago. About two weeks ago, Haven and I went on a walk around the neighborhood and she insisted on taking her new little pink purse with her. Grandma June bought it for her at a Goodwill Store back in December, when Haven spotted it and was smitten. I don’t know why I love this picture so much, but I do. She is so funny with her little handbag out on a stroll.

And in other news…

Our department has a fitness challenge going on, so I am hoping to have much more of a focus on health & wellness this  month. I’m upping my workouts from 3 per week to 4 (well… hopefully) and switching out several of my go-to meals and snacks for healthier ones. This also means I am keeping a food journal again. If you’ve never kept a food journal, I strongly recommend it! Even if you’re not trying to loose weight. Maybe announcing here that I’m keeping one will hold me accountable and I won’t slack off.

Over the next few weeks, I may post a few of my favorite healthy meal options… and my embarrassing and borderline inappropriate exercise playlist. Gotta have my music while burning up some calories. For some reason, I am consistently drawn to the explicit lyric versions.

PS: This is not a sponsored post. All opinions are my own, and I have not received compensation for anything written. Keepin’ it real.


Leave a comment

Spice Things Up… With Oatmeal Raisin Cookies

Are you ready? It’s getting hot in herre! Okay, I can’t believe I wrote that. Please forget all about my writing that, and that Nelly song too. Some things should stay in 2002. The cookies we are about to bake just have an extra kick, I promise!

It is convenient for me, that everyone else in the family shares a same favorite cookie; a spicy oatmeal raisin cookie. It is my husband and my daughter’s favorite cookie, anyway. To be honest, I have no idea what Lo’s favorite cookie is. He is just a little too young to have developed a preference, and if I had to guess I would say chocolate chip. Could be wrong, though. What is my favorite, you ask? Obvi, it is anything with sugar in it.

Haven requested for a tea party (see pictures near end of post) and it was a great excuse to bake our most popular household baked good.

20130126-194016.jpg

These cookies are pretty traditional in nature, but with a hint more spice than usual. They are also surprisingly less greasy than most oatmeal raisin cookies, but still moist and delicious. Let’ s get baking so you can see for yourselves!
20130126-193913.jpg

This recipe is based off of one I found on allrecipes.com (how awesome is that place?) called Beth’s Spicy Oatmeal Raisin Cookies. (Full recipe in shorter-form is at the bottom of the post)

Gather your ingredients:

  • 1/2 cup butter, softened (I prefer unsalted)
  • 1/2 cup butter flavored shortening
  • 1 cup packed light brown sugar
  • 1/2 cup white sugar
  • 2 eggs
  • 1 tsp vanilla extract
  • 1 1/2 cups  all-purpose flour (I prefer unbleached)
  • 1 tsp baking soda
  • 1 tsp ground cinnamon
  • 1/2 tsp ground cloves
  • 1/2 tsp salt
  • 3 cups rolled oats
  • 1 cup raisins

Preheat your oven to 350 degrees F, and line two baking sheets with parchment paper. If you like to use parchment paper. I certainly do.

20130126-193920.jpg

In an standing mixer or large bowl, cream together the butter, shortening, brown sugar, white sugar, eggs, and vanilla until smooth. In a separate medium bowl, combine the flour, baking soda, cinnamon, cloves, and salt. Stir the mixture of dry ingredients into the creamed mixture until well-blended (but don’t overdo it past that point).

I pledge allegiance forever to my kitchen aid. She is amazing, and I am grateful for her everyday. She doesn’t have a name actually… I think it should be something regal. Thoughts?

20130126-193929.jpg

Stir in the oats and raisins until well-blended. Yum. Wait, don’t eat it yet!

20130126-193935.jpg

Drop “by rounded teaspoonfuls” onto the baking sheets. I put that in quotes because, personally, I ended up just scooping up big unmeasured pieces of cookie dough into what looks like it would fit into my mouth in two-ish bites. Scientific precision, I know.

20130126-194021.jpg

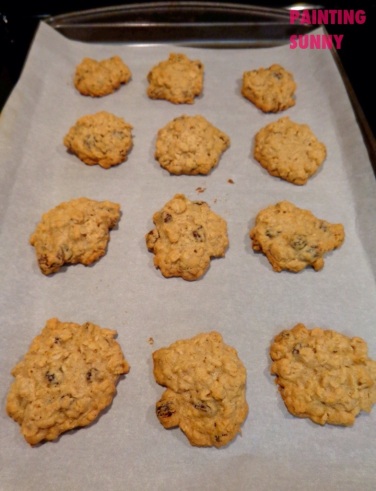
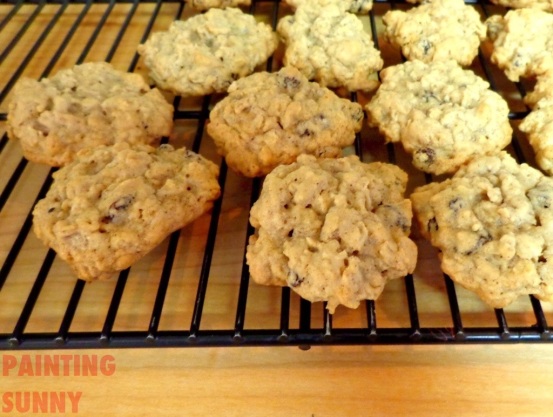
Bake 10 to 12 minutes until light golden brown. Do not over-bake them! It’s hard to show with a camera, but the above and below pictures should demonstrate that they still look nice and light. They darken just a bit as they cool.

20130126-193940.jpg

Let cookies cool for 2 minutes on the baking sheets, then move them onto a cooling sheet until fully cooled. Store in an airtight container or freeze (whatever you don’t eat while standing there waiting for the next batch to finish). These freeze very well – I typically leave half out for the family to eat, and freeze half for later. The freezer cookies are like bonus cookies – two weeks later it is like BAM; delicious without all the work.

20130126-194002.jpg

Haven requested a tea party with her little tea set we haven’t gotten much chance to use until now. She also insisted we have fresh baked cookies for the event, so here we are. They even inspired her little brother to decide he would accept his invitation, and hoard as many cookies as his little hands could hold.

tea party cookies

Anyone else have a family that conveniently agrees on favorite foods? We need it, since half of us don’t eat meat, like different vegetables, and different ice cream flavors. Some common-ground is always a welcome thing.

Spicy Oatmeal Raisin Cookies

Ingredients:

  • 1/2 cup butter, softened (I prefer unsalted)
  • 1/2 cup butter flavored shortening
  • 1 cup packed light brown sugar
  • 1/2 cup white sugar
  • 2 eggs
  • 1 tsp vanilla extract
  • 1 1/2 cups  all-purpose flour (I prefer unbleached)
  • 1 tsp baking soda
  • 1 tsp ground cinnamon
  • 1/2 tsp ground cloves
  • 1/2 tsp salt
  • 3 cups rolled oats
  • 1 cup raisins

Preheat your oven to 350 degrees F, and line two baking sheets with parchment paper. In an standing mixer or large bowl, cream together the butter, shortening, brown sugar, white sugar, eggs, and vanilla until smooth. In a separate medium bowl, combine the flour, baking soda, cinnamon, cloves, and salt. Stir the mixture of dry ingredients into the creamed mixture until well-blended (but don’t overdo it past that point). Stir in the oats and raisins until well-blended. Drop by rounded teaspoonfuls onto the baking sheets. Bake 10 to 12 minutes until light golden brown. Do not over-bake them! Let cookies cool for 2 minutes on the baking sheets, then move them onto a cooling sheet until fully cooled. Store in an airtight container or freeze. These freeze very well!

PS: This is not a sponsored post. All opinions are my own, and I have not received compensation for anything written. Keepin’ it real.